Wednesday, September 4, 2019

How to create secure list in OneDrive

As we are thinking that OneDrive can offer only document library to store our personal documents, but technically OneDrive comes from SharePoint family. So, it can offer lots of feature like SharePoint.

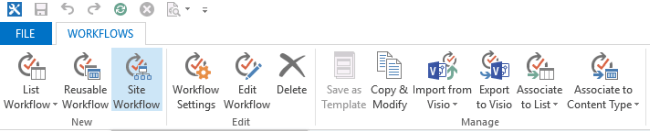
So, in this blog, we are going to learn how to create a new list in OneDrive using GUI. And I am going to create a new list to store my upcoming 
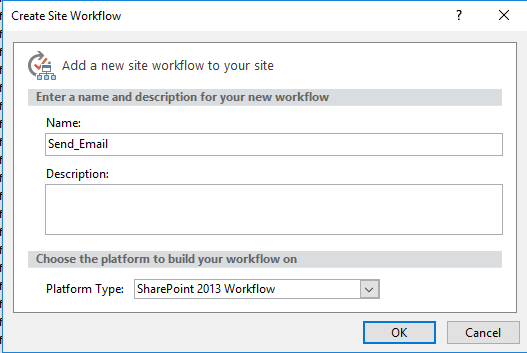
event information and in future I will setup MS Flow to send a reminder email to me.

Most of the SharePoint techie knows, how the SharePoint URL designed and Basically, OneDrive URL formation will be like following format

So, in the above URL just replace Onedrive.aspx to viewlsts.aspx at end of the URL, it will take you to the Site Content page, where you can view and create List, Library, sub-sites and adding SharePoint Apps.


As highlighted in above image, just click new button and select List and on next screen just provide your list name. in my case I just given like MyList and checked Show in site navigation checkbox.


One thing we should know, OneDrive home page has some customized left navigation, so your newly created list will not be displayed.


Once list created, click GOG icon from top right and click List setting to customize your newly created list


I have created Some columns and items in the list


Now if you go to your OneDrive home page, you can’t see your newly created list on Left navigation, so you can copy your List URL and add it in your default library as item. Click new and select link option.


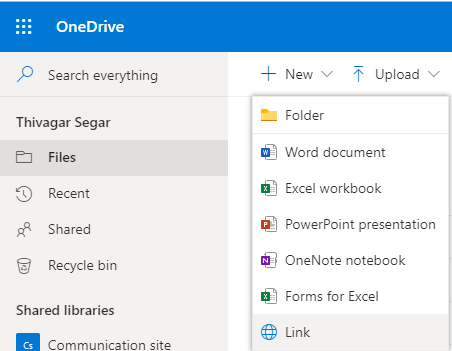
Then, provide your list URL and provide file name for it. And it will store like a bookmark for you


And finally, you can see your new list added in the root library as an item, so you can setup a separate permission for that URL items.


Wednesday, August 28, 2019

Iterate SharePoint List Items And Send A Consolidated Email To a Recipient Using Designer Workflow

By default, there is no OOTB (Out-of-the-Box) workflow to send an email with a consolidated list item, so in SharePoint 2013, the Designer Workflow has a special feature called “Call REST API”.
So, I am using site workflow here, since we are going to iterate the list item.
Iterate The SharePoint List Item And Send A Consolidated Email To The Recipient Using Designer Workflow
Let's give it the name “Send_Email” and select the platform as “SharePoint 2013".
Iterate The SharePoint List Item And Send A Consolidated Email To The Recipient Using Designer Workflow
Once we've entered the Edit mode, click Local Variable from the ribbon and create some basic local variables.
Iterate The SharePoint List Item And Send A Consolidated Email To The Recipient Using Designer Workflow
The variables are -
Variable Name Type
 Index Integer
 RequestHeader Dictionary
 ResponseContent Dictionary
 ItemCollection Dictionary
 SiteURL String

Iterate The SharePoint List Item And Send A Consolidated Email To The Recipient Using Designer Workflow

Step 1
As a first step, log the information in the workflow history to know that workflow is started.
Step 2
Set a variable called Index as 0.
Step 3
Build a dictionary to understand the code from the response. For that, we need to add two values to get the information from SharePoint and assign the output to the RequestHeader dictionary.

Name Type Value
 Accept String application/json;odata=verbose
 Content-Type String application/json;odata=verbose

Iterate The SharePoint List Item And Send A Consolidated Email To The Recipient Using Designer Workflow

Iterate The SharePoint List Item And Send A Consolidated Email To The Recipient Using Designer Workflow

Step 4
Get the current site URL and assign it to an already declared variable called Site URL.

Iterate The SharePoint List Item And Send A Consolidated Email To The Recipient Using Designer Workflow


Step 5
Call the HTTP web service and declare the REST API syntax to get the items.
Iterate The SharePoint List Item And Send A Consolidated Email To The Recipient Using Designer Workflow

Then, click on the properties of the called HTTP Web Service and declare the dictionary on a respective place.
Iterate The SharePoint List Item And Send A Consolidated Email To The Recipient Using Designer Workflow

Iterate The SharePoint List Item And Send A Consolidated Email To The Recipient Using Designer Workflow


Step 6
Log the response code in the Workflow history. If your REST API code works, then the response code would be OK or else, it will return as NOTOK.
Step 7
Get a result from the response content and store those values to the itemCollection variable.
Step 8
Count the number of items gotten from the item collection variable and store it in another variable called Count.
Step 9
You can log the count in Workflow History if required.
Step 10
Create a new variable to store all your looped items in one place. Here, I have created a variable called EmailContent and added some Table Header.
Iterate The SharePoint List Item And Send A Consolidated Email To The Recipient Using Designer Workflow


Step 11
Create a loop with times and add the count variable to run a number of times.
Step 12
Get a first column value by assigning ([%Variable:Index%])/CoumnName from ItemCollection Dictionary and output to a new variable.
Step 13
Repeat the step12 for all your columns.
Step 14
Set the variable that you created on step 10 and declare all column values here.

Iterate The SharePoint List Item And Send A Consolidated Email To The Recipient Using Designer Workflow

Step 15
As a loop, we need to increase the index value with the value 1 because values return like array 0,1,2,3… so, calculate the index value plus 1 and store it in another variable called Calc.
Step 16
Set the calculated calc value to the Index to get another list item.
Step 17
At last, send an email function with the collected items.

Iterate The SharePoint List Item And Send A Consolidated Email To The Recipient Using Designer Workflow

And the full workflow would be like the below image.

Iterate The SharePoint List Item And Send A Consolidated Email To The Recipient Using Designer Workflow

And the final result would be like below.

Iterate The SharePoint List Item And Send A Consolidated Email To The Recipient Using Designer Workflow

Tuesday, August 13, 2019

Update Calculated Column periodically without editing any items in Sharepoint using PowerShell


One of my recent activity was to automate sending email to some Manager’s to provide their approval for their reportees to extend their employment contract for next one year. This can be done using SharePoint workflow, but the challenge is we are not privileged to use the SharePoint Designer.

So, we decided to use the PowerShell script to trigger an email using client context. Then we created required list columns and employee information’s and I created three calculated columns along with that,
  • ·         First is for to get the number of days between last renewal date with today’s date (Today () – last renewal column)
  • ·         Second is for to round the number to nearest digit (= Round (Calucaltedcolumn1,0))
  • ·         Final calculated column is to indicate which items are crossed 365 days and it will set a Flag as Remind as a column value (=IF (second calculated column =< 365),” Remind”, “No”)).

But we were not realized that calculated column will be populate the value when the list items gets modified, since we are using Today() in formula. We can edit the list item using PowerShell but we required Modified date for some reason to track the approval process.

To overcome that, I used below snippet code to update calculated column without editing any items, what it will do it will just update the mentioned column and the it will populate the value.


Thursday, August 1, 2019

Create Virtual machine in Microsoft Azure


Hi Readers, In this article we are going to learn how to create Virtual machine using Azure portal and Powershell console, as a first step we need to create resource group. so lets see what is resource group first.

Resource group 

Resource group is a primary layer of your azure environment, where you can provision, managing assets like VM, Virtual network, storage, etc. a resource group can be used to scope access control of administrative actions and every resource should have a resource group.

Create Resource group using azure portal 


Step 1: Login https://portal.azure.com 
Step 2: select resource group from your left navigation 
Step 3: Click Add button and select your subscription and provide resource group name and select region 


Step 4: click next to tags, it’s just an optional. You can provide value or ignore it 
Step 5: finally click create from bottom and it will take few moments to create resource group at back-end 


Create resource group using PowerShell 


Before that we need to install azure PowerShell modules in your local machine, to install module run the following command in PowerShell 

Install-Module -Name az 

Once the module gets installed successfully, then connect to your azure tenant using below command 

Connect-AzureRmAccount 

After connected to your tenant, run below command to create resource group 

New-AzureRmResourceGroup -Name "createbypowershell" -Location 'Central India'  


Create Virtual machine using Azure Portal 


Step 1: click virtual machine from left navigation 
Step 2: click add and provide VM name, Image and specification on next screen 


Step 3: Provide Administrator name and password and enable inbound port for HTTP(80) and RDP(3389) and click next from bottom 


Step 4: you can select OS Disk type. You have option called Standard HDD, Standard SSD and Premium SSD. I am selecting premium SSD for better performance and click next 


Step 5For every resource azure will automatically create network IP and subnet by own, in this article I am going with default network IP and subnet 


Step 6: you can skip Management, advance and tags. That’s not mandatory for all type of VM’s and click create once you reviewed all information.  


Create using PowerShell

In powershell we can use more parameters to create virtual machine but in this article i used some basic parameters to create virtual machine like name, image, location and resource group name.

New-AzureRmVM -ResourceGroupName "createbypowershell" -Location '